
What's an approval task queue and why do you need it?
Approval task queues are a powerful tool for managing actions that require approval in web apps. These task queues allow you to attach an approval request to an action, so that when a user triggers that action, an approval request is sent to a queue, and only after the request is approved will the action be executed. This approach provides several benefits for applications that handle sensitive data or have a high potential for error.
In this article, we will discuss the benefits of using approval task queues and show you how you can implement them in your own app with Jet Admin.
Benefits of using approval task queues
Improved control over sensitive actions or data
Approval task queues provide an added layer of security for actions that involve sensitive data or have the potential to cause damage if executed incorrectly. By requiring approval before executing an action, you can ensure that only authorized personnel are able to access or modify data. This is especially useful for sensitive processes like financial transactions or the modification of important information.
Reduced risk of accidental or unauthorized actions
Approval task queues also help reduce the risk of accidental or unauthorized actions. By requiring approval before executing an action, you can ensure that only authorized personnel are able to perform certain tasks. This helps prevent mistakes like accidentally deleting important data or making incorrect refunds.
Increased accountability and transparency
Approval task queues also provide increased accountability and transparency. By tracking approval requests and approvals, you can ensure that actions are being performed by authorized personnel and that all actions are properly documented. This can be particularly important in applications that deal with sensitive information.
In summary, approval task queues are a powerful tool for managing actions that require approval, providing improved control, security, and transparency for sensitive tasks. By using an approval task queue, you can reduce the risk of accidental or unauthorized actions, improve accountability and transparency, and streamline workflow for approval processes.
Use cases and examples of approval task queues in web applications
Approval task queues can be used in a wide range of web applications to manage actions that require approval. Here are some common use cases and examples:
Approving data changes
In applications that allow users to submit or modify data, approval task queues can be used to manage changes that require review and approval. For example, when a user adds new data or makes changes to existing data, the approval request can be sent to a queue for review and approval. This helps ensure that the data is accurate, appropriate, and meets the application's standards.
Reviewing financial transactions or refunds
In applications that handle financial transactions or refunds, approval task queues can be used to manage requests for review and approval. For example, when a user requests a refund or initiates a financial transaction above a certain threshold, the approval request can be sent to a queue for review and approval by a financial administrator. This helps ensure that the transactions are legitimate, authorized, and meet the application's financial policies.
By using approval task queues in web apps, you can improve the security, reliability, and accountability of their applications, while also streamlining workflow and reducing the risk of errors or unauthorized actions.
Implementing Approval Task Queues on Jet Admin
There are two parts to implementing an approval task queue for your app in Jet Admin:
- Setting up the task queue
- Setting up the Approval action
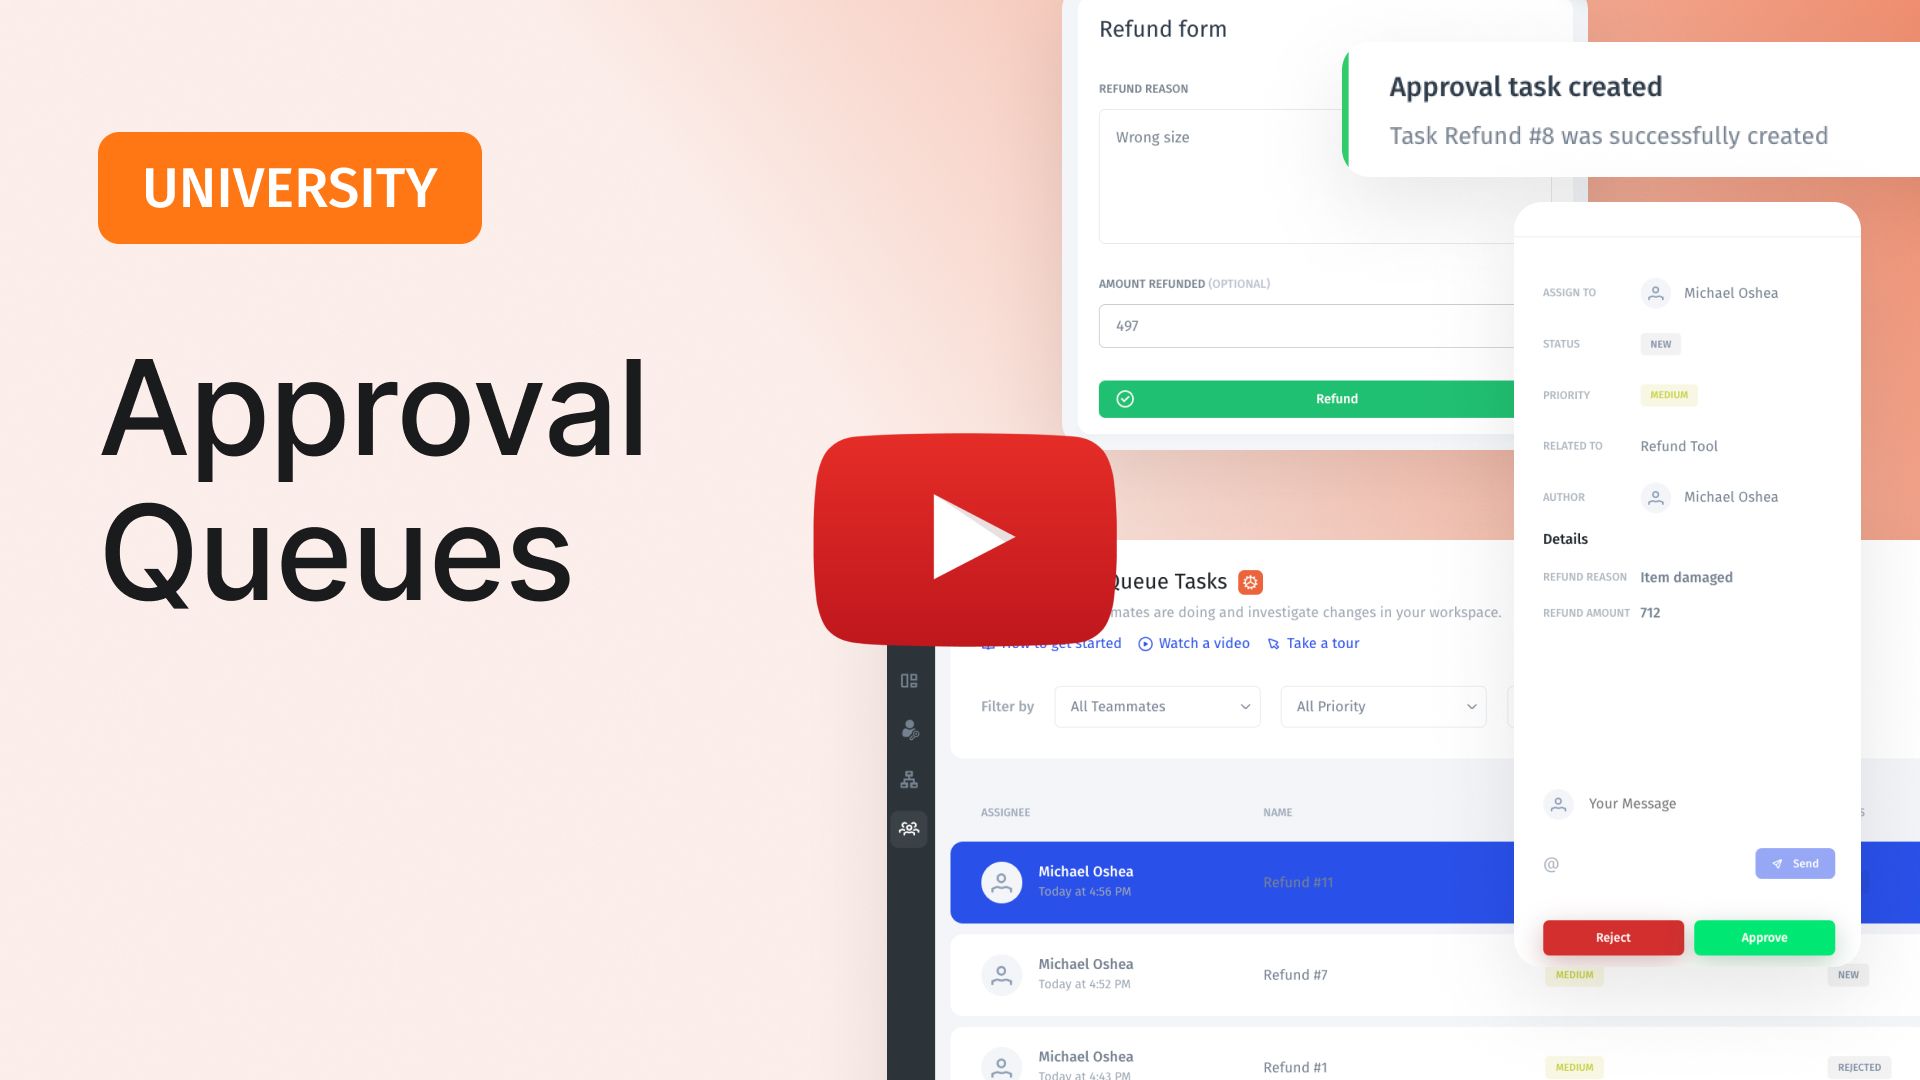
I’m going to walk you through this process, using the example of an approval task queue for refunds – once set up, the refund form will create a request that will need to be approved by, for example, a manager before the refund action will be executed.
Setting up the task queue
Once you already have one task queue, you will be able to hover over the Tasks icon in the menu on the left and from there add another task queue.

However, it’s easiest to set up your first task queue when configuring the Approval options for an action that you want to add to a task queue. You can access the Add new button in the dropdown menu that lets you choose which task queue you want the action to be added to, like here:

In both cases, a modal will appear, in which you need to give the task queue a name, define statuses, and define inputs.

My task queue is for approving or rejecting refund requests, so I’m going to set up my task queue in the following way:

Statuses:
In my demo example, I have only chosen Completed for the Approved status. Completed will execute the action. Because I am either rejecting or approving refunds, I have chosen New for the Rejected status. This way, the action will be cancelled.
If I had a different use case, I might use In Progress as well, but here I only want the action to be executed or be cancelled.
Inputs:
Inputs are needed so that the action request (here refund request) will appear in the task queue with the necessary information. Without including inputs, the approval task queue will still function, but the person giving approving/rejecting tasks won’t be able to see the details of the action request.
In my example, the necessary information is the reason for the refund and the refund amount. Creating these inputs in the queue creates a place where such information will be displayed in the task queue, but I still need to specify what information to submit to these fields when configuring the Approval action (see below).
Once I have given the queue a name and set up Statuses and Inputs, my queue is ready to be used.
Setting up the Approval action
There are a few steps to creating an Approval action.
- Turn on the Approval action
- Choose the desired task queue (or add a new one)
- Give the task a name
- Choose the user who approval requests will be assigned to
- Configure status options
- Specify inputs
Turn on the Approval action
First, go to the form/button/etc. that you want to connect to a task queue. At the top of the form menu on the right, there are three tabs: General, Display, and Actions. Click on Actions, and at the bottom of the Actions menu you will see the Approval button. Click on this button to turn the Approval function on and to begin configuring it.


Choose the desired task queue (or add a new one)
Now, choose the task queue that you want the action request to be submitted to, or add a new one.

Give the task a name
You can give the task any name you want. This is the name that will be displayed in the Approval Task Queue.
For my example, I am going to use the ƒx button to concatenate the words “Refund #” and the number of the order. Doing something like this is a good choice because it will help keep your task queue more organized and usable. If I give my task a static, unchanging name, then the user who is in charge of the task queue will simply see a list of requests that all have the same name. If I use concatenate (or take a similarly record-specific approach), then the user in charge of the task queue will see exactly what record the action request is related to.

Choose the user who approval requests will be assigned to
Here you need to choose which user will be assigned to. Choose the user that you want to be in charge of managing the task queue in question. You can also have multiple users managing the same task queue. For example, if you want all of your transaction details in one task queue, you still have the ability to assign all the purchase requests to User A and all of the refund requests to User B.
(I am the only user in my app, but you would be able to choose from any of your users.)

Configure status options
The next thing to do is to set up the statuses. This affects what will be displayed in the Status column of the task queue, like shown here:

The initial status is what will be displayed when the action is first submitted to the task queue. Here, I will choose New for my refund example, but I might set up my task queue status options differently (e.g. add In progress) and choose something else depending on my use case.
Similarly, I want to choose my Status after Approve and Status after Reject to Approved and Rejected respectively.

Specify inputs
The last thing to do is to specify the inputs for the task. This is important because it defines what details will be included in the task, like shown here:

To set this up so that it submits the information entered in the refund form, you should use the ƒx Formula button. Here, I’ll click Show more to be able to see more component choices, then choose the appropriate inputs from the Refund Modal section.

Perfect, that is the last thing to set up to create a fully-functioning approval task queue! Let’s take a look at how the approval task queue works and looks.
Using the Approval Task Queue
You can access your task queues from the app builder screen, by hovering over the Tasks icon and clicking on the queue that you want to look at.

When you are in the task queue, there are two ways to manage tasks. First is from the main task queue screen. Here, you can click on Approve or Reject, and a modal will appear that gives you the option to provide a reason for approving or rejecting.


You can also select a task to look at it in more detail in a slideout. Doing this also gives you the option of sending a message to the person who submitted the action request (or to another person by using @). In the slideout window, you also have the option of approving or rejecting the request, at which point the same modal will appear.

Conclusion
Approval task queues are a powerful tool for managing actions that require review and approval in web apps. By leveraging the benefits of approval task queues, you can improve the accountability of your app, streamline its workflow, and reduce the risk of errors or unauthorized actions, and overall provide a better experience for your users.
Related video
Other blog posts
How to Build a CRUD App in Minutes
Sync data from Google Sheets to PostgreSQL database in real-time


